Duplicating and Modifying Eclipse User Libraries

Twilight books on Flickr

Eclipse user libraries are wonderfully convenient ways of packaging together related JAR files.  In my Eclipse I create user libraries for each ATG version I install.  As a consultant I am always installing different versions and today I installed ATG 9.0.

Normally I use the GUI to create the user library for the latest ATG server.  However I thought this is quite inefficient because I already have user libraries for previous versions of the ATG server.  I just need to duplicate one of the other ATG user libraries and then tweak the duplicate to have the right path to the JAR files.

Unfortunately the Eclipse GUI does not provide a way to duplicate a library.  So I searched in my workspace files and found in my .metadata/.plugins/org.eclipse.core.runtime/.settings/org.eclipse.jdt.core.prefs file the settings for all my user libraries.

I then edited that file and copied an entry for an older ATG library, org.eclipse.jdt.core.userLibrary.ATG\ 2007.1.  I renamed it org.eclipse.jdt.core.userLibrary.ATG\ 9.0 and updated the paths to where ATG 9.0 is installed and I was done!

ATGLogColorizer for Colorizing ATG Server Outputs and Logs

ATGLogColorizer

Color is wonderful.  With color we can immediately recognize patterns, signals, warnings, etc.  By using a utility that color codes your logs and server outputs to highlight errors in red, warnings in yellow, etc. you can be much more efficient about how you monitor and search.

Back in the day we used to use DynamoFilter.exe to color code the output of running ATG on the Dynamo Application Server (DAS).  Now that people no longer use DAS that application is no longer useful.

Today though I found out about the open source project ATGLogColorizer.  This fantastic utility works with JBoss, WebLogic, DAS and WebSphere.  It works on Windows, Mac OSX, Solaris and other UNIX variants.  It even works on Cygwin.

This is how I start JBoss with ATGLogColorizer on Cygwin.

${ATG}/home/bin/startDynamoOnJBOSS.bat -f -run-in-place -c default -m Foo | ATGLogColorizer.exe'

And this is how I start JBoss with ATGLogColorizer on Mac OS X.

${ATG}/home/bin/startDynamoOnJBOSS.sh -f -run-in-place -c default -m Foo | ATGLogColorizer_v1_2_OSX'

Life has become a little better. 🙂

For further reading please see and ATGLogColorizer and ATG Log Colorizer for JBoss.

How to Add Products to Categories using Content Groups

Typically after you create a category in your catalog you then add products to the category.  The simple way to do that in ATG eCommerce is to use the ACC and add products to the child products property of the category.  However there is another way.

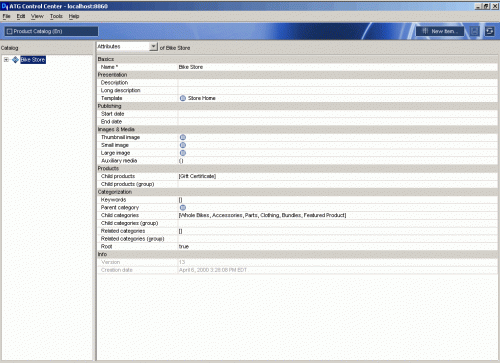
In the ATG Commerce Guide to Setting Up a Store documentation you can see in the Viewing the Product Catalog section that a category can have child products but also child product groups.

Product Catalog

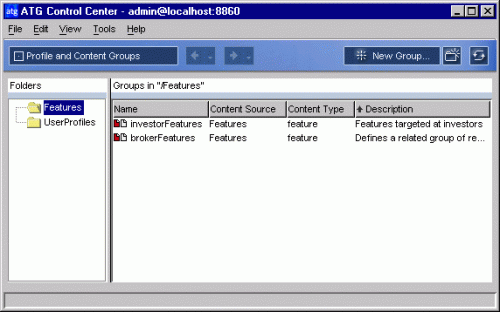
Child product groups are actually content groups which are described in the Creating Content Groups chapter of the ATG Personalization Guide for Business Users.

Targeting > Profile and Content Groups window

Though the documentation shows a content group composed of features you can easily create a content group using the ProductCatalog as a content source and product as a content type.

To create a content group follow the steps in the ATG documentation for Creating New Content Groups except use an item from the ProductCatalog when specifying the Content Type.  Then create the targeting rules for this Content Group.  Now you can specify this group in the Child products (group) property of a category.

ATG Product Bundles

what's in my sxsw schwag bag - photo by joey.parsons - Flickr

Out of the box ATG eCommerce does not support product bundles.  It does support SKU bundles, i.e. a product can consist of multiple SKU’s.

To support product bundles is pretty simple to implement.

First you create a new type of product for bundles in /atg/commerce/catalog/productCatalog.xml.

<item-descriptor name="product">
 <table name="dcs_product">
  <property name="type" data-type="enumerated" default="regular">
   <attribute name="useCodeForValue" value="false"/>
   <option value="regular" code="0"/>
   <option value="bundle" code="1" />
 </property>
 </table>


Then you define your bundles product to have the new products property. This property is simply a list of products that the bundle contains, e.g. Costco organic cotton polo shirt and Nike athletic shorts.

<item-descriptor name="bundle" super-type="product" sub-type-value="bundle">
 <table name="betweengo_product_bundle" multi-column-name="seq_num"
  type="multi" id-column-names="product_bundle_id">
  <property name="products" column-name="product_id" data-type="list"
   component-item-type="product" display-name="Products" category="Bundle" />
 </table>
</item-descriptor>

A few years ago I did a more advanced version of this implementation which allowed for different numbers of products in one bundle, e.g. two different kinds of shirts and one pair of pants.  I did this using the concept of product links which is similar to SKU links that ATG supports.

If you are interested in wanting to implement a more advanced version please contact us.

How to Debug No Output for ATG ForEach

foreach

Today I added a feature in my shopping cart JSP page but nothing was showing up.  This was because the output of ATG ForEach droplet was blanks.

To debug this I did the following steps.

  1. I added an empty oparam to see if the ForEach droplet thought the collection was empty.
    <dsp:oparam="empty">Empty?</dsp:oparam>

    It did not.

  2. I outputted the count in the output oparam to see if it was looping through the collection.
    <dsp:oparam="output"><dsp:valueof param="count"/> <dsp:valueof param="element"/></dsp:oparam>

    It was looping through the collection.

  3. Finally I debugged using Eclipse the ForEach code.  The ForEach code can be found in <ATG>/DAS/src/Java/atg/droplet/ForEach.java

    Using the debugger I realized that the element name of the loop was being set to something else which is why <dsp:valueof param=”element”/> was blank.

It turned out that the ForEach droplet was inside another ForEach droplet and in that droplet they set the element name like this.

<dsp:param name="elementName" value="CommerceItem" />

By setting the elementName parameter to something else in my ForEach droplet and then referencing it properly I was finally able to get the expected output.

<dsp:droplet name="/atg/dynamo/droplet/ForEach">
 <dsp:param name="array" param="CommerceItem.auxiliaryData.productRef.dvds"/>
 <dsp:param name="elementName" value="dvd" />
 <dsp:oparam name="output">
  <dsp:valueof param="dvd.name" />
 </dsp:oparam>
</dsp:droplet>

By the way ATG documentation suggests not using elementName.

elementName and indexName allow you to provide a parameter name other than element and index, respectively. A better way to provide a different parameter name is to use the dsp:setvalue tag.

In our example we would do this instead of setting the elementName param.

 <dsp:setvalue param="dvd" paramvalue="element" />

Debug ATG running on JBoss with Eclipse

Configuring Eclipse for Remote Debugging - O'Reilly Media 

With Eclipse debugging an ATG application running on JBoss is fairly straightforward.

  1. Configure JBoss to start up with Java options for debugging.

    On UNIX you do this by uncommenting this line in <JBoss>/bin/run.conf.

    #JAVA_OPTS="$JAVA_OPTS -Xdebug -Xrunjdwp:transport=dt_socket,address=8787,server=y,suspend=y"

    On Windows you do this by uncommenting this line in <JBoss>/bin/run.bat.

    rem set JAVA_OPTS=-Xdebug -Xrunjdwp:transport=dt_socket,address=8787,server=y,suspend=y %JAVA_OPTS%
  2. Create a remote Java application debug configuration using the port you specified in step 1.  The default port is 8787.

For further reading please see Debugging Nucleus components in JBoss with Eclipse or Remote Debugging with Eclipse.  There is also a very complete tutorial from O’Reilly Media called Configuring Eclipse for Remote Debugging.

How to Get Permission to Create Scenarios in ACC

This is Happening without your Permission

Sometimes you will find that you cannot create or duplicate scenarios.  You keep clicking on the grayed out New Scenario button and right-clicking on scenarios you want to duplicate but nothing happens.

Fortunately the solution is rather simple and is alluded to in the ATG Personalization Programming Guide – Configuring the Process Editor Server.

First you create a scenarioManager.xml file in your <ATG>/home/localconfig/atg/scenario directory like the following.

<?xml version="1.0" encoding="ISO-8859-1" ?>
<process-manager-configuration>

  <process-editor-server>
    <server-name>foobar:8850</server-name>
  </process-editor-server>

</process-manager-configuration>

Next you replace foobar:8850 with the value of /atg/dynamo/service/ServerName.serverName.  You may want to configure the serverName value to something you want because sometimes it might change if for example when you connect via VPN.

Then you restart ATG and reconnect or restart the ACC and you should be able to create and duplicate scenarios.

(Note that when you create the workflowProcessManager.xml file in your <ATG>/home/localconfig/atg/epub/workflow/process directory it can have the exact same contents as the scenarioManager.xml file.)

NameNotFoundExceptions during start up of ATG application on JBoss

When you start up your ATG application on JBoss and see NameNotFoundExceptions like the following it could be because you did not configure your ATG datasources correctly.

Unable to start service "/atg/dynamo/service/jdbc/JTDataSource":
 atg.nucleus.ServiceException:
 Unable to resolve reference to JNDI component:
 java:/atgcore_ds
ERROR [nucleusNamespace.atg.dynamo.service.jdbc.JTDataSource]
javax.naming.NameNotFoundException: atgcore_ds not bound

To properly configure it create an atg-oracle-ds.xml file. I have a sample one below. atgcore_ds is the datasource for most of the ATG repositories. You will probably need to configure datasources for Catalog A and Catalog B if you are doing eCommerce, e.g. atgcataloga_ds and atgcatalogb_ds. The atg-oracle-ds.xml file will go into your server’s configuration, e.g. <jboss>/server/betweengo/deploy.

<?xml version="1.0" encoding="UTF-8"?>
<datasources>
 <local-tx-datasource>
  <jndi-name>atgcore_ds</jndi-name>
  <!-- <connection-url>jdbc:oracle:oci:@Dynamo</connection-url> -->
  <connection-url>jdbc:oracle:thin:@localhost:1521:orcl</connection-url>
  <driver-class>oracle.jdbc.driver.OracleDriver</driver-class>
  <user-name>foo</user-name>
  <password>bar</password>
  <min-pool-size>1</min-pool-size>
  <max-pool-size>4</max-pool-size>
 </local-tx-datasource>
</datasources>

Note that the connection URL should be the same as what you configured in your tnsnames.ora file.  If you installed Oracle with a Microsoft Loopback Adapter and pointed the host in your tnsnames.ora configuration to the loopback connection, e.g. 192.168.1.200, then you should do the same in your atg-oracle-ds.xml file.

For further reading please see Getting Started with ATG – jBoss and Oracle and Create Additional JBoss Application Server Configurations.

Create Additional JBoss Application Server Configurations

JBoss I thought to create an additional JBoss application server configuration one would have to use some kind of administration tool.

It turned out to be much simpler.

cp -R server/default server/betweengo

If you want to create an ATG application server configuration you can do this.

cp -R server/atg server/betweengo

The only difference between the default server configuration and the atg server configuration is that the latter has two additional datasource XML files for communicating with the SOLID database.

atg/deploy/atg-apps-solid-ds.xml
atg/deploy/atg-solid-ds.xml

For further reading please see JBoss configurations to run an application (need active ATG support contract to see this document) or Building Your Own JBoss Configuration or Using JBoss Application Server.

Could Not Install ATG 2007.1

Today I began a contract with Bell Canada on an eCommerce project.  This project is using ATG 2007.1 with Oracle 10g (supported environments for ATG 2007.1).

I downloaded the installer from ATG’s product downloads page which is only available if you have purchased a Standard or Premium Support contract.  Previously this page was publicly available but now it is hidden.  Fortunately I found the link at ATG’s Google group ATG_Tech where they announced that ATG 2007.1 is available.

ATG Support quickly responded to my email to support@atg.com and within a few hours fixed the installer and made available a new installer on the product downloads page.

Lesson learned: Contact ATG Support.  They’re good.