Ignore Unavoidable Generic Type Problems in Eclipse

When you use Eclipse by default most generic type problems show up as warnings. Unfortunately this results in lots of warnings when you use ATG code.

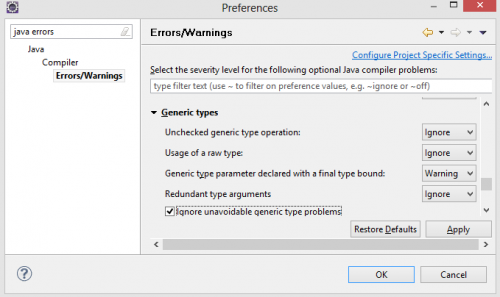
You can turn off the warnings that result from ATG code by checking the option “Ignore unavoidable generic type problems”.

Ignore unavoidable generic type problems

Ignore unavoidable generic type problems

For example you might have code like this where getValues() comes from the ATG API:

getValues().put(name, value);

By default Eclipse reports warnings for the above line. But this is unavoidable and with this Ignore option turned on no warning is reported for this line.

Kind of useful and you don’t have to add @SuppressWarnings(“unchecked”) liberally through your ATG code.

Fixing Resource Already Exists on Disk Errors in Eclipse

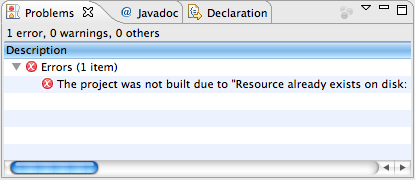
When I imported a new project I could not build it because of “Resource already exists on disk” errors like this.

Eclipse: The project was not built due to "Resource already exists on disk"

The simple fix was to remove the directory, typically classes, which contained the file it was complaining about and then refreshing. Removing just the file and then refreshing did not work.

However when I would do an ant build later and then refresh my project I would get the same error.

The better solution is to tell Eclipse not to copy the files it is complaining about to the output folder.

  1. Go to Project Properties.
  2. Select Java Compiler -> Building.
  3. In the Filtered resources box add the files you don’t want copied.
  4. Rebuild project.

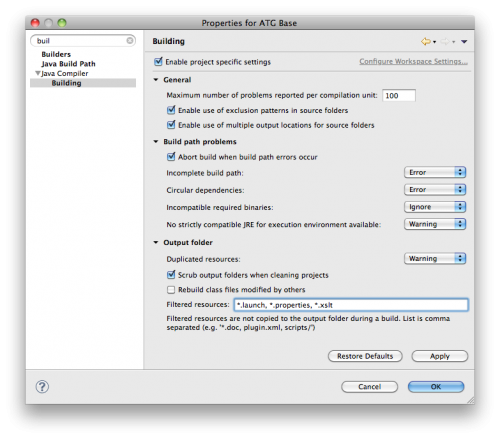
Here is a screenshot showing how I added “*.properties, *.xslt” to the Filtered resources to fix this problem.

Eclipse: Filtered resources in Project Properties, Java Compiler, Building

Eclipse: Filtered resources in Project Properties, Java Compiler, Building

Debugging WebSphere Applications with IBM Rational Application Developer

IBM Rational Application Developer (RAD) is basically a typically IBM heavy version of EclipseWebSphere is a typically IBM heavy version of a J2EE server.  Therefore you would think you could debug web applications using RAD fairly easily like you can on JBoss or ATG DAS using Eclipse.

However I could not find anyone on my latest project who knew how to do this.  Fortunately after much Googling I found this PDF document, Debugging Applications in IBM Rational Application Developer, and on page 12 are instructions on how to do this.

The instructions seem to be a little out of date so here are my instructions.

  1. Log into your Integrated Solutions Console.  The default URL is http://localhost:9060/ibm/console/login.do.
  2. Navigate using the left side column to Servers –> Application Servers.
  3. Select the Application server you want to debug from the list of Application servers.
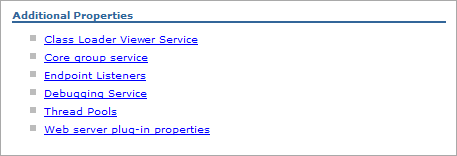
  4. Under the Configuration tab select the Debugging Service link which is near the bottom right in the Additional Properties section.

    Debugging Service link in Additional Properties section

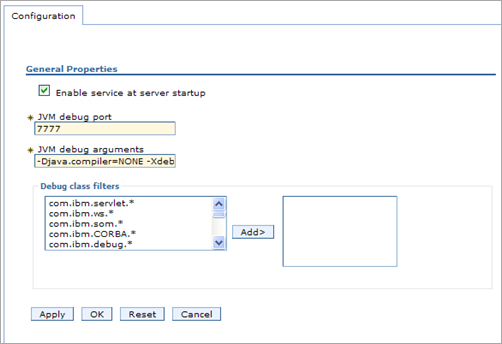
  5. Select the “Enable service at server startup” checkbox.  Note the JVM debug port.

    Debugging Service configuration

  6. Press the Apply button.
  7. In the Messages box, which appeared at the top after pressing the Apply button, click on the Save link.

    Debugging Service messages

  8. Stop and start your Application Server.  It should now be running in Debug mode.
  9. In RAD go to the project for the web application you want to debug.
  10. From the menu select Run –> Debug Configurations.
  11. Select Remote Java Application and press the New button (it’s the top left button).  For the port set it to the JVM debug port (default is 7777).
  12. Press Apply.  Then press Debug.  It should connect to WebSphere’s JVM.

Now you can set breakpoints and even change small amounts of code which will be deployed automatically to WebSphere.  No more waiting 15 minutes to test every change you make because builds are so brutally long. 🙂

Duplicating and Modifying Eclipse User Libraries

Twilight books on Flickr

Eclipse user libraries are wonderfully convenient ways of packaging together related JAR files.  In my Eclipse I create user libraries for each ATG version I install.  As a consultant I am always installing different versions and today I installed ATG 9.0.

Normally I use the GUI to create the user library for the latest ATG server.  However I thought this is quite inefficient because I already have user libraries for previous versions of the ATG server.  I just need to duplicate one of the other ATG user libraries and then tweak the duplicate to have the right path to the JAR files.

Unfortunately the Eclipse GUI does not provide a way to duplicate a library.  So I searched in my workspace files and found in my .metadata/.plugins/org.eclipse.core.runtime/.settings/org.eclipse.jdt.core.prefs file the settings for all my user libraries.

I then edited that file and copied an entry for an older ATG library, org.eclipse.jdt.core.userLibrary.ATG\ 2007.1.  I renamed it org.eclipse.jdt.core.userLibrary.ATG\ 9.0 and updated the paths to where ATG 9.0 is installed and I was done!

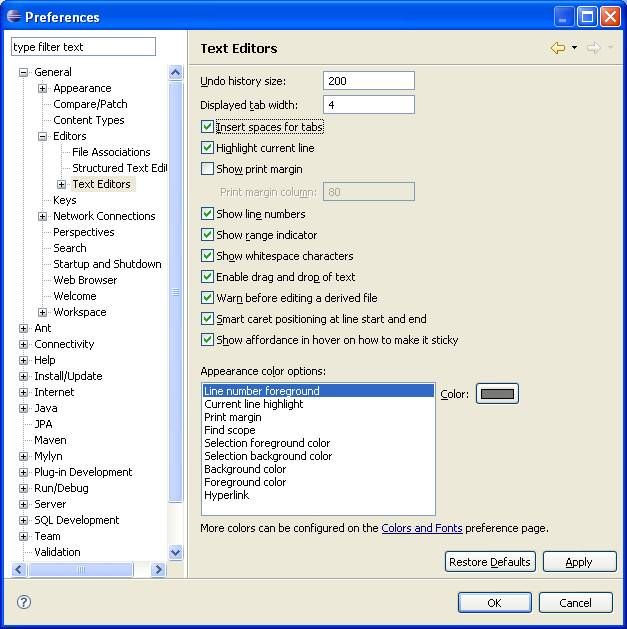
Spaces, not Tabs

The holy war about spaces or tabs continues and you can see all sorts of arguments for each side raging around the internet.

I prefer spaces because it’s a consistent format that remains the same no matter what you are using.  With tabs things appear differently depending on how your editor or other program is configured.  Plus the worst thing is when spaces and tabs get intermixed.

Arguments for tabs such as they take up less room or it’s easier to move around are in my mind weak.  In this day of terabyte disk drives, file size differences between tabs and spaces are trivial and most of your disk space is taken up by images and binary files anyway.  And being able to move around and format quickly is not an issue either with modern editors.

The two editors I use most are XEmacs and Eclipse.  Below I describe how to use spaces for indents for each program.

In Emacs:

(setq-default indent-tabs-mode nil)  ; Use spaces for indents except
                                     ; in buffers that already have
                                     ; their own local values for the
                                     ; variable.

In Eclipse:

Eclipse Ganymede

I was about to write a post about how much I was starting to dislike Eclipse. Two years ago I was singing the praises of Eclipse but Eclipse Europa (version 3.3) in my opinion has been a disaster. It is incredibly slow, crashes often, runs out of memory, etc. I found myself at times using XEmacs instead because it was faster.

But today I installed Eclipse Ganymede (version 3.4) and so far life has been much better.  It is much more responsive, it is not crashing, things are running smoothly.   You can read about what is New and Noteworthy in Ganymede.  The most exciting new feature to me is the Retain case of match when replacing, just like XEmacs.

Also I noticed that in my JBoss project, hot swapping of code is again working.  I am not sure if this is because I upgraded to Ganymede or because I turned on “Build Automatically”.  I suspect it might be the latter.

Maven Integration for Eclipse

Previously I was using an old Maven integration for Eclipse, version 0.0.11, which I got from http://m2eclipse.codehaus.org/update.  The plugin was horribly slow and seemed to sometimes interfere with my builds.

Today I upgraded to the latest, version 0.9.4, from http://m2eclipse.sonatype.org/update/ and things are moving much more smoothly.  You can learn more at Maven Integration for Eclipse.

In Windows > Preferences > Maven I only turned on Download Artifact Sources and Download Artifiact JavaDoc.  Download repository index updates on startup is on by default but I turned it off after receiving this advice from a fellow developer, Bill Crook.

It’s unclear to me how the m2 plugin uses the indexes so I don’t think I can answer you. 🙂 Enabling it causes the plugin to rescan the entire repository if i remember correctly. I personally am not willing to have Eclipse do a full file scan of the local repository each time i start for unknown reasons. if you don’t mind the incurred overhead, go ahead and enable it!

The Maven plugin has a nice dependency feature which Bill Crook explains well.

There will come a time when you need to work on two projects simultaneously. Additionally, there will probably be a dependency from one project to another. The key to doing this effectively is understanding workspace resolution. Workspace resolution is a concept of the m2eclipse plugin. The way this works is that the plugin scans all projects in your workspace and analyzes the poms. Based on group and artifact ID’s the plugin will know if there are interdependencies between your projects. Once the plugin has successfully detected the dependency between projects, you can jump from one project source into another when jumping into methods (via control-click or F3).

There is one important caveat to this, versions. In addition to looking at group and artifact ID’s, the m2eclipse plugin will look at versions to determine if the project for a dependency is in the current workspace. Because of this you must make sure the versions match. Let’s take the example of projects A and B in your workspace. Assume A has a dependency on version 2.0.0.1 of B. Now, if the version of project B in your workspace is 3.0-SNAPSHOT, workspace resolution will NOT work. Can you figure out how to make this work? If you guessed, update the pom of project A to depend on 3.0-SNAPSHOT, you are correct. The moral of the story is be aware of versions when trying to get workspace resolution working.

You will know that workspace resolution is not functioning properly if you see duplicates of the same class when doing searches with control-shift-t. This behavior makes sense when you think about it as Eclipse sees two of these classes in your workspace. For example, continuing with projects A and B as above, let’s assume there is a class Foo in project B. Eclipse would find class Foo in project B source (as java source in your workspace) as well as in version 2.0.0.1 of B (as a class file in jar dependency).

Now if someone would improve the Perforce plugin…

Eclipse memory settings

Recently I have been having problems with Eclipse running out of memory.

Previously I had as my command line argument for Eclipse.

eclipse.exe -vmargs --Xmx512m

The double dashes were a problem, preventing Eclipse to properly load the correct memory settings from eclipse.ini.

I then removed the -vmargs –Xmx512m from the command line argument and instead modified eclipse.ini which is in the top level of the Eclipse installation. This blog article, Eclipse and memory settings, explains how you should put each argument on a separate line and that you can go to Help > About Eclipse Platform and then click on the Configuration Details button to check that Eclipse is running with the correct settings.

I changed this:

-Xms40m
-Xmx512m

to:

-Xms120m
-Xmx1024m

but I reverted back when I realized it was my original command line argument that was the problem.

I tried to use these settings as recommended in this forum, [news.eclipse.tools.jdt] Re: How to prevent out of memory errors?

-Xms120m
-Xmx1024m
-XX:PermSize=256M
-XX:MaxPermSize=512M

But for some reason that kept crashing the Eclipse startup.

Maven Assembly Convert Shell Scripts to use UNIX LF’s

In a previous post, Shell Scripts with Windows LF’s Fail in Latest Cygwin, I wrote about how to use Perforce to check out all files in UNIX format. However if you use Eclipse then this solution will not work because Eclipse always inserts Windows LF’s in any line you insert into a file leading to a mess with files that have both UNIX and Windows LF’s.

However if you happen to use Maven to generate / copy your shell scripts to their target directories you can take advantage of the lineEnding property in the Assembly Director. If you specify the lineEnding property to be “unix” then the outputted shell scripts will be in UNIX format. For example:

<file>
  <source>src/main/scripts/foo.sh</source>
  <outputDirectory>bin</outputDirectory>
  <lineEnding>unix</lineEnding>
</file>