Ignore Unavoidable Generic Type Problems in Eclipse

When you use Eclipse by default most generic type problems show up as warnings. Unfortunately this results in lots of warnings when you use ATG code.

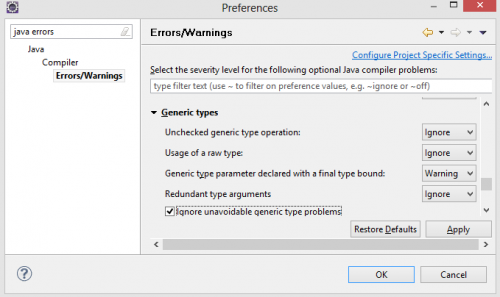
You can turn off the warnings that result from ATG code by checking the option “Ignore unavoidable generic type problems”.

Ignore unavoidable generic type problems

Ignore unavoidable generic type problems

For example you might have code like this where getValues() comes from the ATG API:

getValues().put(name, value);

By default Eclipse reports warnings for the above line. But this is unavoidable and with this Ignore option turned on no warning is reported for this line.

Kind of useful and you don’t have to add @SuppressWarnings(“unchecked”) liberally through your ATG code.

Fixing Resource Already Exists on Disk Errors in Eclipse

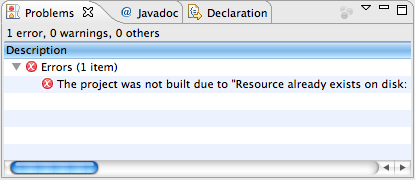
When I imported a new project I could not build it because of “Resource already exists on disk” errors like this.

Eclipse: The project was not built due to "Resource already exists on disk"

The simple fix was to remove the directory, typically classes, which contained the file it was complaining about and then refreshing. Removing just the file and then refreshing did not work.

However when I would do an ant build later and then refresh my project I would get the same error.

The better solution is to tell Eclipse not to copy the files it is complaining about to the output folder.

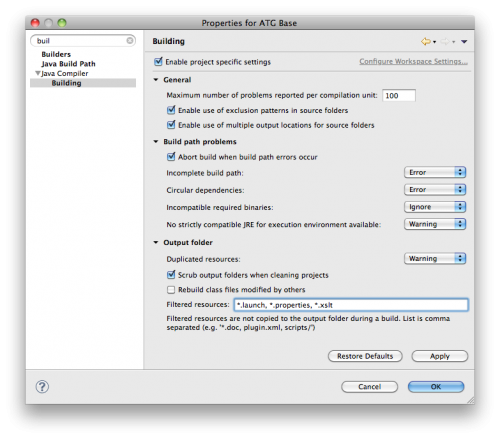
  1. Go to Project Properties.
  2. Select Java Compiler -> Building.
  3. In the Filtered resources box add the files you don’t want copied.
  4. Rebuild project.

Here is a screenshot showing how I added “*.properties, *.xslt” to the Filtered resources to fix this problem.

Eclipse: Filtered resources in Project Properties, Java Compiler, Building

Eclipse: Filtered resources in Project Properties, Java Compiler, Building

Debugging WebSphere Applications with IBM Rational Application Developer

IBM Rational Application Developer (RAD) is basically a typically IBM heavy version of EclipseWebSphere is a typically IBM heavy version of a J2EE server.  Therefore you would think you could debug web applications using RAD fairly easily like you can on JBoss or ATG DAS using Eclipse.

However I could not find anyone on my latest project who knew how to do this.  Fortunately after much Googling I found this PDF document, Debugging Applications in IBM Rational Application Developer, and on page 12 are instructions on how to do this.

The instructions seem to be a little out of date so here are my instructions.

  1. Log into your Integrated Solutions Console.  The default URL is http://localhost:9060/ibm/console/login.do.
  2. Navigate using the left side column to Servers –> Application Servers.
  3. Select the Application server you want to debug from the list of Application servers.
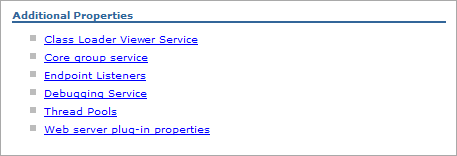
  4. Under the Configuration tab select the Debugging Service link which is near the bottom right in the Additional Properties section.

    Debugging Service link in Additional Properties section

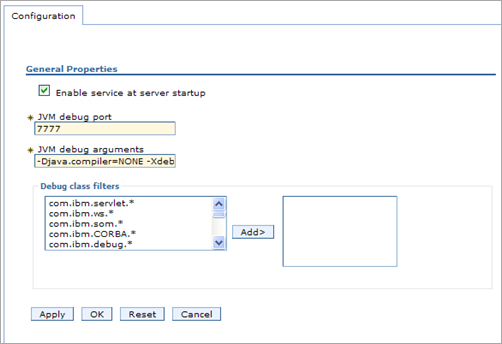
  5. Select the “Enable service at server startup” checkbox.  Note the JVM debug port.

    Debugging Service configuration

  6. Press the Apply button.
  7. In the Messages box, which appeared at the top after pressing the Apply button, click on the Save link.

    Debugging Service messages

  8. Stop and start your Application Server.  It should now be running in Debug mode.
  9. In RAD go to the project for the web application you want to debug.
  10. From the menu select Run –> Debug Configurations.
  11. Select Remote Java Application and press the New button (it’s the top left button).  For the port set it to the JVM debug port (default is 7777).
  12. Press Apply.  Then press Debug.  It should connect to WebSphere’s JVM.

Now you can set breakpoints and even change small amounts of code which will be deployed automatically to WebSphere.  No more waiting 15 minutes to test every change you make because builds are so brutally long. 🙂

Ignore Files and Directories in Subversion

snubbed by Rennett Stowe

In the course of a project there are always files and directories that you don’t want to check in but which Subversion complains it doesn’t know anything about them.  So it makes sense to tell Subversion to ignore them, in other words, keep quiet. 🙂

The mechanism for doing this works okay but I wouldn’t say it’s perfect.

This is how I do it.

  1. Go to the directory where want to ignore a file or subdirectory.
  2. Issue the command
    svn propedit svn:ignore .
  3. Your editor then will be launched and you can enter one line at a time those files and/or subdirectories you want to ignore.
    some_file
    some_directory
  4. Commit your changes.
    svn commit -–depth empty

    Two things to notice.

    1. --depth empty argument

      only commit the propedit changes

    2. Committing your changes means everyone will end up ignoring these files and/or directories so make sure you are ignoring the right ones.
  5. If you don’t want to commit your changes you can revert them.
    svn revert .

For further reading please see Pete Freitag’s blog post Ignore Files and Directories in Subversion.

Duplicating and Modifying Eclipse User Libraries

Twilight books on Flickr

Eclipse user libraries are wonderfully convenient ways of packaging together related JAR files.  In my Eclipse I create user libraries for each ATG version I install.  As a consultant I am always installing different versions and today I installed ATG 9.0.

Normally I use the GUI to create the user library for the latest ATG server.  However I thought this is quite inefficient because I already have user libraries for previous versions of the ATG server.  I just need to duplicate one of the other ATG user libraries and then tweak the duplicate to have the right path to the JAR files.

Unfortunately the Eclipse GUI does not provide a way to duplicate a library.  So I searched in my workspace files and found in my .metadata/.plugins/org.eclipse.core.runtime/.settings/org.eclipse.jdt.core.prefs file the settings for all my user libraries.

I then edited that file and copied an entry for an older ATG library, org.eclipse.jdt.core.userLibrary.ATG\ 2007.1.  I renamed it org.eclipse.jdt.core.userLibrary.ATG\ 9.0 and updated the paths to where ATG 9.0 is installed and I was done!

Perforce Review

You can have Perforce alert you about changes to sections of the depot.

To do this using the Perforce GUI.

  1. Go to User -> Edit <your name>…
  2. Add the branches in the Reviews section that you want to monitor.  For example:
    //depot/main/.../pom.xml
    //depot/main/com/betweengo/foo/...
    //depot/proj/.../bar/...

Thanks to fellow developer Bill Crook for the tip.

Update: Michael Delaney, Perforce guru, pointed out that this works only if a P4Review daemon is running which it is not by default.

Deconstructing software to find bugs

In the September/October 2008 Technology Review I read a short article on Seth Hallem, one of the TR35.  The subtitle of this article was “Deconstructing software to find bugs.”

As a graduate student at Stanford, Seth Hallem perfected an improved approach to finding bugs, called static analysis…  Hallem developed algoritems to … examine only the most important combinations, allowing millions of lines of code to be examined quickly and efficiently.  He cofounded Coverity in San Francisco.

Perforce Adding a Directory Tree

This article, Adding a Directory Tree, shows how to add a directory tree to your perforce repository.

  • On UNIX, run:
    find . -type f -print | p4 -x - add

    The above find command will find files, but will not find symlinks. Nevertheless, you can add symlinks to Perforce using a similar method. Be aware, however, that symlinks are read-only entites, and that editing a symlink is not the same as editing the file it references.

    To discover the symlinks that exist in your client workspace and assess whether or not you want to version them, run the following command from your client workspace root:

    find . -type l -print
    
    (That's an "el" as in "l" for link)

    To add symlinks, run:

    find . -type l -print | p4 -x - add -t symlink
  • On Windows, using the MS-DOS command shell, run:
    dir /b /s /a-d | p4 -x - add

Perforce Branching

Perforce branching is pretty simple.

Say you want to create a branch called

//depot/fkim/foo

First you would add it to your client.

//depot/fkim/foo/... //fkim/foo/...

Next you would do an integration from where you wanted to cut the branch.

p4 integrate //depot/work/foo/... //depot/fkim/foo/...

Then you would submit the integration and the branch will be created and updated in your client work space.

p4 submit